


Continuous Delivery with GitLab CI and Ansible (part 2)
Alas, it took us some time to deliver the continuation on part 1 of our series. We were quite busy doing work for our customers. But here it is. So, thanks for all your patience!
While part 1 sketched the bigger picture of how to use Ansible in combination with Gitlab CI to automate delivery of your software to various environments, this article details how to deploy your Gitlab artifacts using Ansible. That is, we will take a look at a complete pipeline that - in the end - will deploy our Spring Boot application on a staging environment.
We will start with an overview of the IT landscape involved. This should bring us up to speed as well again:
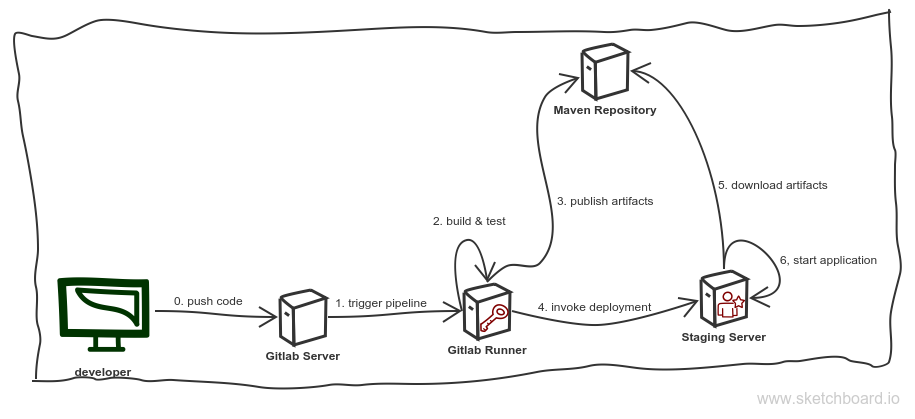
Some parts of this sketch should be familiar. We have the developer that pushes code https://git-scm.com/) to a Gitlab server (step 0), which in turn triggers the pipeline (step 1). The pipeline sets all the rest in motion: its jobs are responsible for building and testing the application (step 2), publishing the built artifact to a Maven repository (step 3), triggering the Ansible powered deployment on the staging servers (step 4) which uses the repository of step 3 to download the artifact(s) (step 5) and, finally, (re)starts the updated application (step 6).
In what follows, we will take a closer look at the jobs within the pipeline. Remember, a pipeline is nothing but a series of jobs Gitlab will execute for us. The first job within the pipeline is to build and test the Spring boot application.
The pipeline for a given code repository is defined in a file called
.gitlab-ci.yml. This is, what the definition of the steps 2 and 3 of
our pipeline could look like:
variables:
  # This will supress any download for dependencies and plugins or upload messages which would clutter the console log.
  # `showDateTime` will show the passed time in milliseconds. You need to specify `--batch-mode` to make this work.
  MAVEN_OPTS: "-Dorg.slf4j.simpleLogger.log.org.apache.maven.cli.transfer.Slf4jMavenTransferListener=WARN -Dorg.slf4j.simpleLogger.showDateTime=true -Djava.awt.headless=true"
  # As of Maven 3.3.0 instead of this you may define these options in `.mvn/maven.config` so the same config is used
  # when running from the command line.
  # `installAtEnd` and `deployAtEnd`are only effective with recent version of the corresponding plugins.
  MAVEN_CLI_OPTS: "--batch-mode --errors --fail-at-end --show-version -DinstallAtEnd=true -DdeployAtEnd=true"
  POSTGRES_DB: our_test_project_database
  POSTGRES_USER: our_test_project_user
  POSTGRES_PASSWORD: our_test_project_password

cache:
  paths:
    - /root/.m2/repository

stages:
  - build
  - test
  - release

validate:jdk8:
  stage: build
  script:
    - 'mvn $MAVEN_CLI_OPTS test-compile'
  image: maven:3.5.0-jdk-8

deploy:jdk8:
  stage: test
  services:
    - postgres:9.6
  script:
    - 'mvn --settings settings.xml $MAVEN_CLI_OPTS -Dspring.profiles.active=gitlab deploy'
  image: maven:3.5.0-jdk-8

release_staging:
  stage: release
  image: williamyeh/ansible:centos7
  only:
    - master
  tags:
    - ansible
  script:
    - 'ansible-playbook -i staging deploy.yml'
Let's walk through this step by step. At first, we declare some variables we use later on:
variables:
  # This will supress any download for dependencies and plugins or upload messages which would clutter the console log.
  # `showDateTime` will show the passed time in milliseconds. You need to specify `--batch-mode` to make this work.
  MAVEN_OPTS: "-Dorg.slf4j.simpleLogger.log.org.apache.maven.cli.transfer.Slf4jMavenTransferListener=WARN -Dorg.slf4j.simpleLogger.showDateTime=true -Djava.awt.headless=true"
  # As of Maven 3.3.0 instead of this you may define these options in `.mvn/maven.config` so the same config is used
  # when running from the command line.
  # `installAtEnd` and `deployAtEnd`are only effective with recent version of the corresponding plugins.
  MAVEN_CLI_OPTS: "--batch-mode --errors --fail-at-end --show-version -DinstallAtEnd=true -DdeployAtEnd=true"
  POSTGRES_DB: our_test_project_database
  POSTGRES_USER: our_test_project_user
  POSTGRES_PASSWORD: our_test_project_password
Next, we declare a list of paths (actually, in this case it is just one) that should be cached between jobs. We do not want Maven to download all dependencies over and over again:
cache:
  paths:
    - /root/.m2/repository
After that is done, we declare three
stages. A stage can be
used to group different jobs. Jobs that belong to the same stage are
executed in parallel. Our three stages are build, test, and release:
stages:
  - build
  - test
  - release
There is one other thing that stages do: Jobs belonging to a
particular stage are only executed if the jobs of the preceeding stage
have succeeded. In this case, jobs of the test stage would only be
triggered if the jobs build stage have been executed
successfully. That is quite handy.
Here is what the sequence of stages of the pipeline look like in Gitlab:

After all the preliminaries are dealt with, we can now go on defining
the jobs that Gitlab should execute for us. The first is called
validate:jdk8:
validate:jdk8:
  stage: build
  script:
    - 'mvn $MAVEN_CLI_OPTS test-compile'
  image: maven:3.5.0-jdk-8
This job belongs to the build stage and has the following two
properties: (1) It executes mvn test-compile with the
$MVN_CLI_OPTS we have defined in the variables section. This will
process the resources, compile the application and the tests. (2) It
runs within a Docker
image,
in this case the
maven:3.5.0-jdk-8 image found at
Docker Hub.
The next job is the deploy:jdk8 job. It's definition looks like that:
deploy:jdk8:
  stage: test
  services:
    - postgres:9.6
  script:
    - 'mvn --settings settings.xml $MAVEN_CLI_OPTS -Dspring.profiles.active=gitlab deploy'
  image: maven:3.5.0-jdk-8
It is a job of the test stage. It runs Maven again and uses the same
docker image as the validate:jdk8 job does. In addition to that,
however, it needs a running
PostgreSQL. It uses the variables set
above in the variables section. Yes, it's that easy. The database
Gitlab provides us with is available under the hostname postgres. We
therefore change the JDBC connection string by selecting a
Spring profile
created for this purposes.
The last job is the release job we've all been waiting for. Let's take another look at it:
release_staging:
  stage: release
  image: williamyeh/ansible:centos7
  only:
    - master
  tags:
    - ansible
  script:
    - 'ansible-playbook -i staging deploy.yml'
In this case, we release our Spring Boot application to a staging
environment. This job is part of the release stage and is only
triggered when the master branch changes. (Note: This is not
true for the previously defined jobs. Those are triggered by every
commited and pushed change to the repository.)
It is possible to not automatically (re)deploy the application for
every change in the master branch. You can add when: manual to
the release_staging entry in the .gitlab-ci.yml to let Gitlab know
that deploying a change to the staging environment requires manual
triggering by a developer. (This can be done by pressing the proper
button within the pipeline section of that Gitlab project, i.e. the
"play button" on the pipeline image below.) The whole entry would then
look like this:
release_staging:
  stage: release
  image: williamyeh/ansible:centos7
  only:
    - master
  when: manual
  tags:
    - ansible
  script:
    - 'ansible-playbook -i staging deploy.yml'

The actual work in this job is done by Ansible. The job itself does
one thing only: Execute ansible-playbook.
Another thing to note is the tags element. A
tag is a means to select a
specific Gitlab runner for this job. A
runner can have one or more tags. This job has the ansible
tag. That means
that the Gitlab runner for this tag
is selected here.
The image we use here is a high-quality user-provided image of
CentOS 7 providing Ansible for us. It executes the playbook we've
talked about earlier.
The playbook is the next thing we should take a look at in detail. Here it is in its entirety:
---
- hosts: web
  become: true
  tasks:
    - name: Install python setuptools
      apt: name=python-setuptools state=present
    - name: Install pip
      easy_install: name=pip state=present
    - name: Install lxml
      pip: name=lxml
    - name: Download latest snapshot
      maven_artifact:
       group_id: our.springboot.application
       artifact_id: our_springboot_artifact_id
       repository_url: http://our_springboot_server.bevuta.com:8080/artifactory/our_springboot_application/
       username: our_springboot_user
       password: our_springboot_password
       dest: /home/our/springboot_application.jar
    - name: Copy systemd unit file
      copy: src=our_springboot_application.service dest=/etc/systemd/system/our_springboot_application.service
    - name: Start web interface
      systemd:
        state: restarted
        name: our_springboot_application
        enabled: yes
        daemon_reload: yes
The first part is rather simple: This playbook defines tasks for all
hosts belonging to the group web and yes, Ansible should gain root
rights on the target machine(s), that is why we set become: true.
The rest of it defines tasks Ansible should execute for us. At first, we
install some Python tools Ansible needs to execute the
maven_artifact task we ask it to do later on:
- name: Install python setuptools
  apt: name=python-setuptools state=present
- name: Install pip
  easy_install: name=pip state=present
- name: Install lxml
  pip: name=lxml
This is not very elegant, alas. Maybe you know of a better way to do this? Let us know!
After we've prepared the target machine(s), we download the artifact Gitlab has built for us (step 2) and uploaded to the Maven repository (step 3 of our pipeline, remember?):
- name: Download latest snapshot
  maven_artifact:
    group_id: our.springboot.application
    artifact_id: our_springboot_artifact_id
    repository_url: http://our_springboot_server.bevuta.com:8080/artifactory/our_springboot_application/
    username: our_springboot_user
    password: our_springboot_password
    dest: /home/our/springboot_application.jar
At last (and finally) we (automatically) start our Spring Boot
application by enabling a
systemd unit whose
unit file we let Ansible create on the target machine(s):
- name: Copy systemd unit file
  copy: src=our_springboot_application.service dest=/etc/systemd/system/our_springboot_application.service
- name: Start web interface
  systemd:
    state: restarted
    name: our_springboot_application
    enabled: yes
    daemon_reload: yes
A unit file describes a so-called systemd unit, that is, "a service, a socket, a device, a mount point, an automount point, a swap file or partition, a start-up target, a watched file system path …" ( man/systemd.unit).
In our case, Ansible produces a unit file that describes to systemd
how it should handle our_springboot_application, namely that it
should be started automatically whenever the system boots.
And that's it. Our Spring Boot application has been build, tested, uploaded to a maven repository, downloaded, deployed and started. All that automatically.